Monday, December 23, 2013

wishing you merry!


Since we're having record high temperatures for December 
and lots of rain instead of snow,  
the gigantic blue tarp remains over the structure of my new studio to protect it 
while it waits for periodic sunny weather.  
At least the construction crew are enjoying being home with their families for the holidays.


And I'm wishing you the same,
a very merry and blessed Christmas with those you love!


Don't forget to keep your name on the "nice" list throughout the new year! :)


Tuesday, December 10, 2013

new stamps by eileen hull with crafitti direct


My creative friend Eileen Hull has been showcasing some exciting news
over on her blog!  
Eileen has teamed up with Crafitti Direct to produce her
new line of clear stamp designs.
In preparation for their introduction at CHA in January, 
Eileen allowed me to take her first 3 stamp sets (shown below) for a test drive.


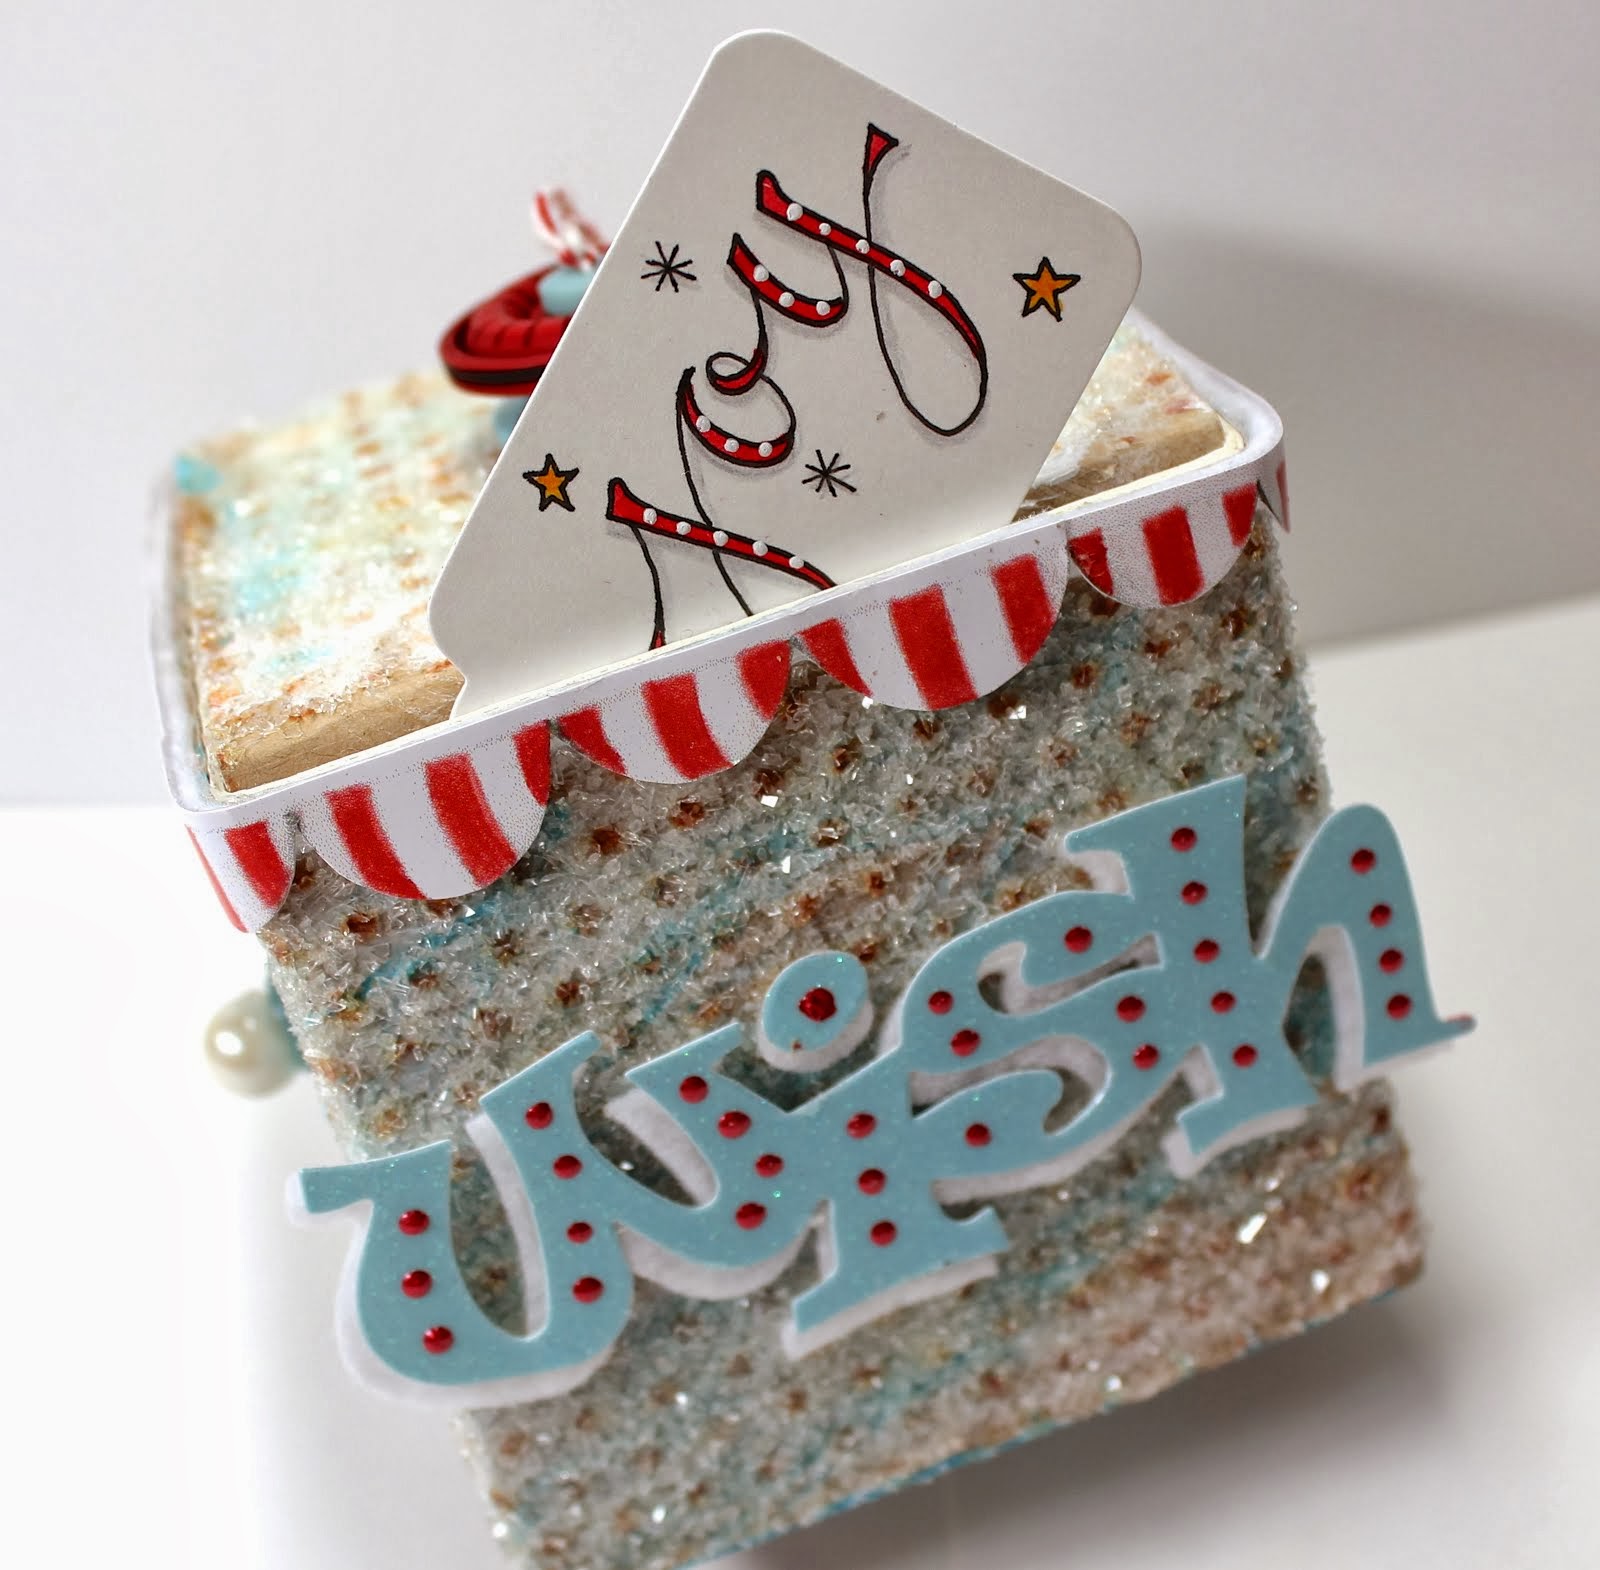
On my drive home from Eileen's home, I was already happily planning my project, 
a little holiday journal cover that would combine stamps from each of her sets.  
And of course, it would also be in her favorite color scheme.  
Below are the stamps I chose to use:


Since I'm primarily a painter, that's how I approached this project.
The cover and spine are made from 140-lb hot-press Fabriano watercolor paper
painted loosely with acrylics in Eileen's colors as background for
the stamped cover elements.


For the cover elements, I stamped the barn wood, flower wreath and leaf hinges
on smooth Bristol paper, cutting them to the shapes that fit my project.
For the spine, I stamped Eileen's "grill" pattern directly on front and back
of the fold, using black Staz-On ink for all.
   

The barn wood inset is painted with a light wash of
Golden Quinacridone Nickel Azo Gold and Yellow Ochre acrylic paints.
For the flower wreath and leaf hinges, I smooshed a layer of grassy green over the
stamped images with a Ranger Adirondack paint dabber (sorry, I couldn't see a paint name).
To paint in the details, I used a small round brush and
the same Golden acrylic paints plus Martha Stewart Beach Glass blue.
I added the impression of white snow on the leaf stripes with a
Sennelier white oil pastel crayon.
For the "real" snow, a line or dab of glue holds the Diamond Dust in place.
A frosty white button sewn to the barn wood cover holds the flower wreath in place.


Now my little holiday travel journal is ready for some watercolor paper signatures.
With the tree branches around my house bending under lots of snow, 
it's just the day for sewing in the pages.
I hope you are enjoying winter wherever you are!


Sunday, December 08, 2013

first snow equals stalled studio construction


After 8 months of proofing architectural drawings and
enduring endless county requirements and delays,
we've happily (finally) begun construction of my new studio.
Yay!!

So far we've accomplished de-construction, removing the attics and roof above the garage and family room, and then started construction with laying
the 40+foot-long support beams, the 20+foot long floor joists,
and the pressure-treated supports for the back balcony.
It may not sound like much, but it's very exciting to have finally started.

I'm hoping to show you photos as building progresses, although initially they won't be very glamorous. :)  The project is expected to take 3 months, but we've already been stalled by our first snow this season.


I hope you'll stay tuned as my small studio becomes a big reality by this spring.
With large windows and plenty of space, I'll have room again to
make my large-scale paintings and also for holding classes.


But first, we have to get through this icy standstill in northern Virginia.

Tuesday, November 19, 2013

chunky little book for holiday lists


This fat little book was so much fun to make, using Eileen Hull's 
versatile XL Square Box Scoreboard die for Sizzix,  
as another sample for our class on Saturday afternoon, December 7th, 
at Angela's Happy Stamper in Reston.


Within its small frame, there are plenty of pages to make lots of holiday lists, 
like a gift list, a wish list, and that naughty and nice list.
It can hold tags and pockets, too!


In class, Eileen and I are teaming up show you how to create the box and then
how to use the same die to create a chunky book and a shaker ornament.


Although I forgot to photograph the inside liner of this book, 
it's a series of holiday words doodled in outline and then colored in.  
This book liner to color will be part of the class kit, along with instruction sheets
and handwritten tags for embellishing your projects
for the holidays.


Come join Eileen and me for a crafty afternoon Saturday, December 7th, 

Wednesday, November 13, 2013

time to start making your holiday wish box


Ho, ho, ho!  Once again the fabulous Eileen Hull and I are teaming up to teach a class using Eileen's awesome dies for Sizzix.  This time we'll be using her XL Square Box Scoreboard die to create a trio of holiday projects.   Starting with the box shape, we'll make a glittery hanging ornament, a photo box for any season, and a fun chunky book for all your holiday lists.


By the way, check out Eileen's blog to see her stop-animation video showing her 3-D Artist Trading Blocks, the new trend being introduced at CHA this January, using her new block dies!!


And then, come join Eileen and me at Angela's Happy Stamper in Reston on Saturday, December 7th, from 1-4 pm!  We'll be busy little elves all afternoon!


Friday, October 18, 2013

autumn doodle days

.
I'm so grateful for another beautiful autumn day!

Between a house full of family visiting here for several months  
(including my sweet youngest granddaughter who is a bundle of energy) 
and my studio construction plans running into delay after delay at the county level 
(where there is a reputation for unenergetic mire ... to be nice about it), 
I need to be coddled by the weather for as long as possible! :)

Not much time for doodling lately, 
although I bought a new Strathmore toned journal 
and briefly tried lettering something every couple days ... yay me!  
Here are some modest results of that short-lived endeavor, some still in progress.  

And since I've been been asked frequently, some info on pens I've used
(pretty simple, as doodling can be).


"Afternoon sun" handmade journal page:
Fabriano hot-press w/c paper with acrylic wash background
(leftover paint from previous project added quickly to the blank page 
during clean-up), with
black Pitt pen doodles (india ink dries quickly, is then permanent), 
Copic markers (because of the acrylic wash, the Copics don't bleed into the paper)


Emily Dickinson poem in lettering journal:
Faber-Castell Pitt pens black #199 (S),  opaque white #101 (big marker),
gold #250 (1.5), plus red pencil


Flourish doodles in lettering journal:
Pitt pens black #199 (S),  opaque white #101 (big marker),  gold #250 (1.5), 
plus neon red and rose gel pens on special at Target


Project Life cards:
PL-sized cards cut from Strathmore Bristol smooth tablet, Pitt pen black (S), Copics


"Art is the magic and hope of an awesome life" in lettering journal:
Faber-Castell Pitt pens black #199 (S),  opaque white #101 (large marker),
Faber-Castell pencil and magazine words


Wednesday, August 21, 2013

the interrupted practice of art journaling


I so wish I could make the practice of art journaling a daily or even weekly routine. It's such an enjoyable, relaxing, and imaginative outlet.  But the truth is I seldom have that kind of time.  So my pages remain an exploration seldom finished.


Even so, I'm finding out what I like as I try out different approaches and different tools. Since I like to paint and draw and doodle and letter, that's what usually appears on my pages.  Collage can be lots of fun, but I don't much like being held hostage to a pile of paper.  It's just easier for me to draw whatever happens to come along in my bits of time.  And although I love to write, I'm not much of a self-confessional journaler, so for me the pages are all about opportunities for line and color.  I might start with the line and add color, or the reverse.


Sometimes it's a long while before I get back to a journal page in progress.  Often, I don't remember where I meant to go with the page.  No matter.  I just enjoy adding another layer in the time I have, leaving it to finish when I can.  The painted page above eventually became the doodled page below.  It may change again when I have ten minutes.  It's all good.


Tuesday, June 18, 2013

more doodle lettering


Sometimes it's a good day, and sometimes it's not.
Either way, some doodle lettering can add a bit of fun.
Or maybe just slow time down a little.


Saturday, May 04, 2013

doodled song lyrics


Spent an afternoon warming up for a lettering project 
by listening to some favorite songs and doodling the lyrics.

Tuesday, March 19, 2013

recent journal pages


It's been a while since I've photographed and shared any of my art journaling pages. Life keeps happening, trips keep popping up, and I think I do more suitcase-packing than anything else.  But today, while sweet little Eliää is having a sick day with a tummy upset, our out-and-about-Oxford plans are on hold.  So I've looked back through my camera roll to find a few photos I'd posted somewhere but not here on my blog. Here's a little recap of pages, some still in progress, with the spring-like colors I'm craving right now:


Monday, February 18, 2013

heartfelt box with eileen hull


Although I ran out of time to post this before Valentine's Day, I wanted to share a version of a project I'm currently working on.  Just arriving in stores now is the new line of "From My Heart" dies by my creative designer friend Eileen Hull with Sizzix.  
Eileen and I are super excited to be teaching another class together in April, 
using this really cool heart box she designed.


Eileen's Scoreboard Dies are innovative designs for cutting thicker materials like matboard.  For my sweetly simple Valentine version, first I painted 
a sheet of 140-pound Fabriano watercolor paper with a soft wash of 
Golden's Light Magenta acrylic paint.  Then I used Eileen's heart-box die to cut two heart shapes for the top and bottom of the box, running the top heart through a texture plate.  Using another die from her new line, I also cut several sizes of flowers with heart-shaped petals from the same painted paper.

For a little glitz, I doodled on the flowers and outlined the heart-box top with Ranger's Liquid Pearls in Platinum.  After the Liquid Pearls dried, I stacked my flower layers, cutting into some of the flowers to fluff the petals. 


Next I die-cut a second set of two hearts and box sides from heavy Strathmore Bristol Smooth paper and assembled the box.  To make the white paper blend better with my painted paper, I dabbed the edges with Tim Holtz's Distress Stain in Spun Sugar.  Then I adhered the textured heart to the top of the box and added the layered flower.


Thinking it would be fun to add a Valentine sentiment to the box, I die-cut a banner from Bristol paper using an old Sizzix banner die (which I couldn't find online anymore).  With a Pitt black ink pen, I doodled the word "heartfelt" and filled it in with a Prismacolor watercolor pencil, also shading the tag ends.  Using adhesive only on the tag ends, I shaped the banner into a slight curve.


This heart box will be so easy to tailor to many occasions, including Mother's Day.  
I'll definitely be making more boxes as Eileen and I prepare to teach our class together.

(Our Sentiment Box class will be held at Angela's Happy Stamper in Reston
on April 9th (6 pm) and April 13th (1 pm).  Come join us. :)